Have a roaring good time with the Darling Dinos Bundle by Stampin’ Up! and bring some playful energy into your cardmaking. Whether you’re crafting for a kiddo’s birthday, sending a smile to a friend, or just making cards for fun, this bundle is packed with personality and prehistoric charm.

If you’ve never stamped a dinosaur in a top hat before, well—you’re in for a treat. The Darling Dinos Stamp Set has everything you need to build your own scene: smiling dinos, punny sentiments, and a whole bunch of tiny accessories like party hats, hearts, bow ties, and flowers. The dies? Yep, they match perfectly and make cutting out all those little extras super easy.
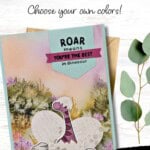
For today’s card, I kept it clean and simple, making use of how easy the dies are to use. I wanted the dino to take center stage, so I chose a bright, happy color palette to pop him out of his shell. A few die-cut details finished it off without too much fuss. It came together in less than 15 minutes, but still feels fun and thoughtful.
What’s great about this Bundle is how flexible it is. You can color the dino’s with markers, watercolor them for a softer look, or even just stamp them in solid colors if you’re in a hurry. Add a few layers or keep it simple—either way, your cards will turn out dino-mite.
Keep scrolling for tips, supplies, and a quick breakdown of how to make this all-occasion cutie. I can’t wait to see how you make these dino’s your own.
How To Make This Card
Project Skill Level: Worker Bee
Worker Bee projects are designed for the crafter who has a bit more time and enjoys creating a handmade card that features a technique or tool. In many cases, a Stampin’ Cut & Emboss Machine is required for die-cutting and/or embossing.
Cardstock Measurements:
- Pool Party Cardstock: 5-1/2″ x 8-1/2″, scored at 4-1/4″
- Basic White Cardstock: 4″ x 5-1/4″ (2 pieces)
- Thoughtful Journey Designer Series Paper: 4″ x 5-1/2″
- Pool Party Cardstock: 1-3/4″ x 2″
- Berry Burst Cardstock: 3/8″ x 2-1/4″
- Woven Textures Designer Series Paper: 2″ x 4″ (for die-cutting)


Grab your Free copy
Get 5 Bee-utiful Exclusive
Card Sketches in Your Inbox
Join our newsletter and receive a honey of a package of five quick & simple cards guaranteed to make your creativity buzz! Sign up now and let the goodness flow straight to your inbox!
Step-by-Step Instructions:
- Fold the Pool Party cardstock in half at the score line to create the card base.
- Adhere one of the 4″ x 5-1/4″ pieces of Basic White cardstock inside the card.
- Adhere the Thoughtful Journey Designer Paper to the front of the card.
- Stamp the “roar” sentiment onto the 1-3/4″ x 2″ piece of Pool Party cardstock using the Black Memento ink pad. Below that, stamp the “you’re the best” and then “in dinosaur” using the same ink, making sure to leave a bit of space between each sentiment. Using scissors, create a “banner notch” at the bottom of the cardstock.
- Stamp the sentiment onto the Berry Burst cardstock using Black Memento ink. Using scissors, “banner notch” each side of the sentiment. Adhere the Berry Burst cardstock over the Pool Party cardstock from Step #4 and then adhere to the front of the card as shown on the sample.
- Using the neutral Woven Textures Designer Series Paper, run through the Stampin’ Cut & Emboss Machine and die-cut 3 of the large “broken dino egg shell” and 1 of the small “broken dino egg shell using the Darling Dino Dies. Using the “splotch” stamp, ink, ink up with Gray Granite ink pad, stamp once on one of the large shells, then again on the 2nd shell , and finally on the 3rd shell without reinking the stamp. Set aside.
- Using the other piece of 4″ x 5-1/4″ Basic White cardstock, stamp the Dinosaur once and the rock image 3 times using Black Memento ink. Color in the Dinosaur using the Berry Burst Blends and the rocks using the Gray Granite Blends.
- Run the Basic White cardstock through the Cut & Emboss Machine and die-cut the images using the Darling Dino Dies.
- Using the sample for placement, adhere the die-cut pieces from Steps 6 and 8 onto the front of the card. Note: I used Stampin’ Dimensionals for the Dinosaur with his “shell hat” and the large broken egg that has the darkest Gray Granite ink.
A Tip from Barb
For Step #4, I added all 3 of the sentiments on one block to make stamping that sentiment easier. Test it on a piece of scratch paper before stamping onto the Pool Party cardstock for perfect placement.
I appreciate you dropping by! My mission is to inspire you with card tutorials that are as fun to make as they are to give. If you’re curious about the specifics of crafting today’s design, just send me an email. Want more papercrafting ideas? Join my Facebook Community today.

Don’t forget to pin this for later!