
If you love soft florals and elegant details, this Elegant Fragrant Layers Bundle Floral Card Idea using Stampin’ Up!® products is one you’re going to want to try. This card combines layered die cuts, a fresh color palette, and a beautiful designer paper background to create something that feels polished—but still totally doable.
There’s something really special about having a go-to card design that works for just about any occasion. Whether you need a birthday card, a thinking of you note, or just something to pop in the mail, this floral design checks all the boxes. The Fragrant Layers Bundle makes it easy to create a card that feels thoughtful without needing a lot of complicated steps.
One of the best parts of this card is that the overall layout does a lot of the work for you. By using a window-style opening with the floral die cuts layered inside, you instantly create depth and interest. It gives the card that “wow” factor without needing lots of extra embellishments or techniques.

JULY ordering Bonus
A Bonus for You!
Any order you place in July includes a free 10-project tutorial featuring the Velvet Meadow Suite that you can use with any Bundle in your stamp stash.
It’s filled with cozy, step-by-step card ideas to spark your creativity when your order arrives — so you’re not staring at supplies wondering where to start.
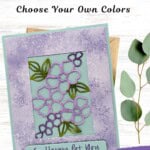
Another gentle win here is the use of Designer Series Paper for the background. That soft Highland Heather texture might look like it was sponged, but it’s actually from the Subtles Designer Series Paper. This is such a great reminder that you don’t always have to create your own backgrounds—sometimes the perfect one is already done for you!

When it comes to design choices, the color combination really shines. Pool Party creates a soft, calming base, while Highland Heather adds that gentle pop of floral color. Then the Granny Apple Green leaves bring in just enough contrast to keep everything feeling fresh and balanced. Using Stampin’ Blends for the leaves adds a smooth, vibrant finish that really stands out against the softer background tones.
Another design detail that makes a difference is the layering of the floral dies themselves. The Fragrant Layers Bundle is designed to build dimension, and you can see that in how the flowers overlap and flow across the window opening. It creates movement and keeps your eye traveling across the card.
How To Make This Card
You’ll find the full supply list and step-by-step instructions below.

Soft Floral Fragrant Layers Card with a Fresh Spring Color Combo
Supplies Needed
- Pool Party Cardstock: 5-1/2" x 8-1/2" Card Base
- Basic White Cardstock: 4" x 5-1/4" Inside Card
- Subtles Designer Series Paper: 4" x 5-1/4" (Highland Heather)
- Basic White Cardstock: 3" x 4" (for die-cutting)
- Pool Party: 3/4" x 3-1/2" (for die-cutting sentiment)
Instructions
- Fold the Pool Party cardstock in half to create your card base.
- Adhere the 4" x 5-1/4" piece of Basic White cardstock inside the card base and decorate as desired.
- Run the Highland Heather Subtles paper through the Stampin' Cut & Emboss Machine and die-cut out the center using the Rectangle Floral Frame. Using scissors, carefully snip out the floral image. Use this piece on another card if desired.
- Using the 3" x 4" piece of Basic White cardstock, run through the Cut & Emboss Machine and cut out the center using the same die as used in the previous step. Color in the large floral image using the Light Highland Heather blend, being careful to not overlap the other images. Tip: I used the nib end rather than the Brush tip end for better control.
- Color in the leaves using the Dark Granny Apple Green Blend and the smaller flowers using the Dark Highland Heather Blend.
- Using adhesive, layer the Basic White die-cut onto the back of the Highland Heather Subtles paper so that only the flowers show through on the front side. Adhere to the front of the card.
- Stamp the sentiment onto the 3/4" strip of Pool Party cardstock using Highland Heather ink. Run through the Cut & Emboss Machine using the long sentiment label. If desired, carefully trim off the rounded extensions at both ends.
- Adhere the sentiment label to the front of the card using Stampin' Dimensionals to finish.
Notes
This card isn’t quite a beginner project since it does use a Stampin’ Cut & Emboss Machine for the dies, but it’s still very approachable once you’ve used dies a few times. And honestly, this is the kind of project that helps build confidence with layering and composition.
At the end of the day, this is exactly the kind of card that reminds us why handmade matters. It’s beautiful, it’s thoughtful, and it’s something that will truly brighten someone’s day when they receive it. So grab your Fragrant Layers Bundle, pull out your favorite colors, and give this design a try—and don’t forget… make a card, send a card
Love this color combo? Pin it for later!

Supplies Used:


Sale: $7.50
Price: $12.50


One more little perk while you’re shopping. Each month there’s a Product of the Month you can add for just $5 when your order reaches $75. It’s a fun surprise that’s not in the catalog and only available while supplies last. Click To Learn More
If you enjoy simple, cozy cardmaking like this, you’d love the creative support we share inside the Creative Living Room. If you have questions about today’s tutorial, please email me for detailed steps. Inspire your craft with more ideas—join me over on Pinterest!


Grab your Free copy
Get 5 Bee-utiful Exclusive
Card Sketches in Your Inbox
Join our newsletter and receive a honey of a package of five quick & simple cards guaranteed to make your creativity buzz! Sign up now and let the goodness flow straight to your inbox!


Love it!!!!
Thank you so much Tamara! I appreciate your comment – it made my day!