If you’re looking for fresh ideas using this month’s Paper Pumpkin kit, you’re in the right place. In this post, I’m sharing creative ways to stretch the supplies from the August 2025 Alternative Paper Pumpkin Projects. This Kit, Farmhouse Florals, is a beautiful Kit and whether you’ve already made the original designs or you’re ready to try something new, these projects will help you see just how versatile this kit can be.

The August 2025 Paper Pumpkin Kit, Farmhouse Florals, is one of those kits that quietly surprises you. I didn’t expect to love it as much as I do—but between the vintage artwork, bonus stamp set, and rich colors like Secret Sea and Pecan Pie, this kit had me reaching for extra cardstock and embellishments before I even finished my first card.
If you’re new to Paper Pumpkin, our monthly craft box subscription, here’s the quick rundown: each month’s All-Inclusive Kit features pre-cut card bases, embellishments, an Ink Spot, and an exclusive stamp set. All you have to do is open the box and craft!

Here’s a peek at the original projects:
WATCH THE VIDEO
Gorgeous, right?
Now let’s talk alternate ideas. I made three cards using pieces from the kit, along with some extra cardstock, dies, and embellishments I had on hand. These projects are meant to show just how far you can stretch your supplies—and how easy it is to add your own creative twist.
Love these projects? Unlock exclusive weekly crafting tutorials delivered straight to your inbox! Sign up now and start creating with us—it’s free!
Alternate Project 1: Windowsill Card
I started with a 5-1/2″ x 8-1/2″ (scored at 4-1/4″) Pool Party cardstock base. Optional: using Versamark ink, I stamped the floral image around the edges of the Pool Party card front.
I then layered the Windowsill piece onto a 3-3/4″ x 5″ piece of Poppy Parade cardstock. I wrapped the Linen Thread from the Kit 2 times around the Poppy Parade cardstock and tied into a bow. The Poppy Parade mat was then layered onto the Pool Party card base.
The sentiment was stamped onto a 1/2″ x 2″ piece of Basic White cardstock and mounted onto the card using Stampin’ Dimensionals. To add a bit of elegance, I added 3 of the Shades of Green Hexagon Gems.
Why it works: The Pool Party softens the Poppy Parade cardstock and floral images on the window frame and gives it a quiet, cozy vibe—like a note you’d leave on a neighbor’s porch.

Alternate Project 2: Basket Thank You Card
This one was all about that beautiful floral basket. I layered it onto a piece of Balmy Blue Beautiful Bokeh Designer Paper and then Early Espresso cardstock, both die-cut out using the Everyday Arches Dies.
I then layered these pieces onto a 5-1/2″ x 8-1/2″ (scored at 4-1/4″) piece of Crushed Curry cardstock to really bring out the colors of the flowers. I stamped the sentiment using Balmy Blue ink onto a 1/2″ x 2″ piece of Basic White cardstock, cutting the right side at an angle to give it some interest.
I finished it off by adding the basket handle from the Kit, and added several of the flower images using Stampin’ Dimensionals.
Why it works: Mixing warm tones (Pecan Pie & Crushed Curry) with cool ones (Balmy Blue and the floral images) gives this card a cozy, end-of-summer feel.

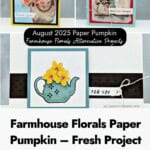
Alternate Project 3: Teapot Card
This alternative card uses the most supplies from the Kit. I started by using one of the Paper Pumpkin card bases (you could also use Basic White cardstock), and then added a 1″ x 5-1/2″ strip of Early Espresso cardstock that was stamped with the tri-dots background stamp and Versamark ink.
I then cut a 2-1/2″ x 2-1/2″ square of Lost Lagoon cardstock and cut one of the card bases down to a 2-1/4″ x 2-1/4″ square. (Tip: if you’ve used all your card base, this piece can be cut from Basic White cardstock.) On the 2-1/4″ square, I stamped the Teapot using Black ink, and colored it in using a Dark Lost Lagoon Blend. To add some interest to the teapot, I inked only 3 of the tri-dots image carefully using the Black ink pad and stamped onto the colored tea post. (If you’re nervous about this step, just skip it!)
The two squares were then adhered together and added to the card front using Stampin’ Dimensionals. I took one of the sentiment strips from the Kit, stamped “for you” on it using Black ink, added a Linen Thread bow, and adhere it to the front of the card as shown in the sample.
Why it works: This design balances bold and soft elements. The bright yellow flowers immediately draw the eye, while the grounded Early Espresso strip gives the layout structure. Adding the delicate stamped sentiment tag keeps it from feeling heavy, and the twine bow adds just enough handmade charm. The small sentiment is unobtrusive but meaningful—perfect for letting the teapot remain the star of the card.

Thanks for stopping by for today’s Card Kit project! My goal is to help you make quick & easy greeting cards for all occasions. If you’d like more detailed directions on how to make these cards, feel free to email me.
I hope you’ll join me again for more card-making ideas! I’d love to see what you have created so mention me @bzbstamper, tag me @bzbstamper or comment below where I can see your creations!