Crafting a Tiled Techniques Birthday Card is a wonderful way to bring extra joy to someone’s special day. This card combines the intricate patterns of the Tiled Techniques Stamp Set from Stampin’ Up! with classical colors and embellishments, creating a visually stunning piece that stands out from the typical store-bought card. Birthdays are all about personal touches, and what better way to show your care than with a handmade card?

In this tutorial, learn how to layer stamps to build up a dynamic and colorful background that complements your birthday wishes. We’ll discuss colors and papers and how to position your stamps to create a cohesive pattern. Additionally, I’ll share some tips on incorporating other elements like classic embellishments to add depth and interest to your card.
This card isn’t just a piece of paper; it’s a keepsake. By the end of this post, you’ll have all the inspiration and know-how needed to start creating your own unique birthday cards using the Tiled Techniques Stamp Set, ensuring your birthday greetings are as special and memorable as the person receiving them.
How To Make This Card
Project Skill Level: Busy Bee
Busy Bee projects are designed for the beginner or busy papercrafter. This is a basic cardmaking project that can be achieved by someone who has never made a handmade card before. You can view more Busy Bee cards here.
Cardstock Measurements:
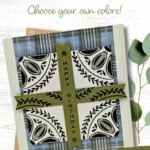
- Soft Sea Foam Cardstock: 5-1/2″ x 8-1/2″, scored at 4-1/4″
- Timeless Plaid Designer Paper: 3-1/2″ x 5-1/2″
- Soft Sea Foam Cardstock: 3-1/4″ x 3-1/4″
- Old Olive Cardstock: 1/2″ x 4″ (2 pieces)


Grab your Free copy
Get 5 Bee-utiful Exclusive
Card Sketches in Your Inbox
Join our newsletter and receive a honey of a package of five quick & simple cards guaranteed to make your creativity buzz! Sign up now and let the goodness flow straight to your inbox!
Step-by-Step Instructions:
- Fold the Soft Seafoam Cardstock in half at the score line to create you card base.
- Adhere the 3-1/2″ Timeless Plaid Designer Paper to the center of the card base.
- Using the 3-1/4″ square of Soft Sea Foam cardstock, stamp the “round corner” stamp in the four corners of the cardstock using Mossy Meadow ink.
- Using the two 1/2″ strips of Old Olive cardstock, “banner notch” the ends of both pieces using your scissors.
- On one of the 1/2″ strip, stamp only the top “leaf” part of the stamp used in Step #3 using Mossy Meadow ink. Repeat until the entire 1/2″ strip if stamped.
- Stamp the sentiment onto the center of the other 1/2″ strip using Mossy Meadow ink. Adhere to the 3-1/4″ stamped square of the Soft Sea Foam cardstock. (See sample for placement.)
- Adhere the Soft Sea Foam square to the upper center of the card using Stampin’ Dimensionals.
- To finish, add a small Textured Dot embellishment at the top/bottom of the sentiment strip.
Thank you for visiting! I’m here to guide you through creating beautiful all-occasion cards that come together effortlessly. Should you need further instructions to craft today’s card, don’t hesitate to reach out via email. Don’t miss out—subscribe to my newsletter for exclusive tutorials and card-making tips today!

Don’t forget to pin this for later!